Contents
SwiftUI provides a way to provide a contextual menu for a view, with contextMenu(menuItems:) and friends, but it requires you to manually specify the entire contents of the contextual menu. That means it does not include the standard Services submenu.
A brief history of Contextual Menus
Contextual menus were introduced [to the Mac] in 1997 with Mac OS 8, with the new Contextual Menu Manager system extension and associated Contextual Menu Modules. See also the Mac OS 8 edition of the HIG (page 93).
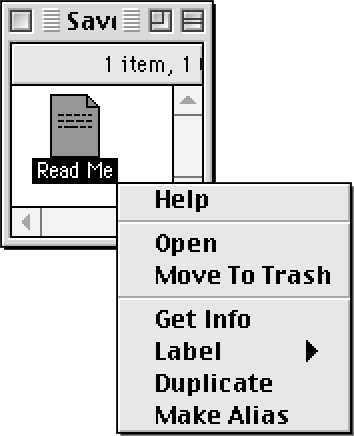
Support varied a lot in the early days, though, and some user-interface conventions didn’t solidify until a few years later. e.g. SimpleText didn’t support contextual menus at all in Mac OS 8.0, and while 3rd party apps like BBEdit eventually did, it took longer still for now-standard items to become commonplace, like Cut / Copy / Paste.
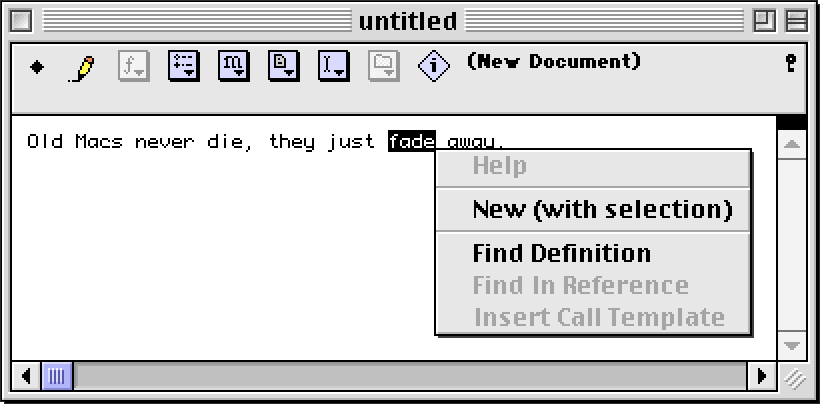
Broadly-speaking, contextual menus have changed very little over the decades. At some point the app-specific commands were separated from the system-wide commands, the latter becoming relegated to the current “Services” submenu. And the specific menu items have of course evolved over time, but the basic idea has persisted: to provide app-specific or built-in commands followed by commands proffered by system-wide extensions.
It’s chuckle-worthy to remember that when Mac OS 8, with Contextual Menus, was introduced, Macs still had one-button mice. I don’t recall but assume it was possible to connect a mouse with multiple buttons, to a Mac, but remember that no Macs had USB at this time (that didn’t arrive until the iMac in August 1998, nearly a year later). Prior to USB, Macs used different I/O ports than PCs (ADB vs PS/2, for the most part), so there were a lot fewer mouse (and keyboard) options for Macs. Thus, contextual menus were originally – and to this day still also – invoked by control-clicking. You might have encountered the term “secondary-click[ing]”, which arose in that era to abstract over whether it was a physically distinct mouse button or just a modified left click1.
It apparently wasn’t until the Mighty Mouse in 2005 that Apple actually shipped a multi-button mouse. (I say apparently because I don’t personally recall, and I had switched to 3rd party mice long before then anyway so I probably didn’t even notice at the time)
🤔 I don’t know why SwiftUI gets the terminology wrong, calling it the “context menu” rather than contextual menu. It’s not just SwiftUI – Apple’s latest Human Interface Guidelines have the same spelling error.
The correct term (in both English and from precedence) is contextual. The menu provides contextual commands (or context-sensitive, if you prefer). It is not a “context” menu. That doesn’t even make sense. It doesn’t provide context, it is contextual.
Are Services still relevant?
I assume that the Services submenu – whether through contextual menus or the app menu – is not used by most Mac users today, if only because the Mac user-base has expanded massively and most people barely leave their web browsers. I’ve heard Services derided or overlooked as a “power-user” or “niche” feature. Which is sad, because they can be very handy.
More importantly, some of your app’s users might rely heavily on Services as part of their personal workflow and choice, and it’s really not our place – as native Mac application developers – to tell them they shouldn’t use a standard system feature.
It’s frustrating for end-users to encounter applications which don’t support standard Mac features, like Services, and makes such applications stand out as non-native or otherwise broken.
It is sad that SwiftUI is in the general company of Electron and its ilk, here.
So how’s it done?
There’s probably at least two ways to do this, one of them being to manually insert the Services menu item into an otherwise vanilla SwiftUI menu. But I quickly ran into non-trivial challenges in pursuing that avenue, as you can’t just ask AppKit for the Services menu item, or its contents. Alas.
Ultimately I found it easier – and more in keeping with the grain – to instead just not use SwiftUI for contextual menus at all. But fortunately that doesn’t mean abandoning SwiftUI entirely, merely intermingling some AppKit into it.
The basic design is the standard AppKit sandwich2: an NSViewRepresentable containing an NSHostingView.
The first part is particularly easy, and just the usual annoying boilerplate:
struct ContextualMenuView<Content: View>: NSViewRepresentable {
    let viewContent: () -> Content
    let textProvider: @MainActor () -> String

    init(@ViewBuilder viewContent: @escaping () -> Content,
         text: @autoclosure @escaping @MainActor () -> String) {
        self.viewContent = viewContent
        self.textProvider = text
    }

    func updateNSView(_ nsView: ContextualMenuViewImplementation<Content>,
                      context: NSViewRepresentableContext<ContextualMenuView>) {
        nsView.rootView = self.viewContent()
        nsView.textProvider = self.textProvider
    }

    func makeNSView(context: Context) -> ContextualMenuViewImplementation<Content> {
        ContextualMenuViewImplementation(rootView: viewContent(),
                                         textProvider: textProvider)
    }

    func sizeThatFits(_ proposal: ProposedViewSize,
                      nsView: ContextualMenuViewImplementation<Content>,
                      context: Context) -> CGSize? {
        return nsView.fittingSize
    }
}
I’ve hard-coded it for text in this example, for simplicity, but you can adjust that to suite your needs.
⚠️ The sizeThatFits(…) implementation is a bit arbitrary. SwiftUI’s view sizing methodology is mildly infuriating, in the sense that it’s both very limited in its capabilities and very confusing for what little it does. It took me a lot of trial-and-error and reverse engineering to figure out what value I needed to return. But I suspect it’s context-sensitive, based on what the subview does. So feel free to adjust it as necessary for your own use.
For convenience it’s nice to add a view modifier for this too:
extension View {
    func contextualMenu(for textProvider: @autoclosure @MainActor () -> String) -> ContextualMenuView<Self> {
        ContextualMenuView(viewContent: { self },
                           text: textProvider)
    }
}
And now on to the real guts of all this, the custom NSView subclass that will define the contextual menu. Fortunately, NSView has very straightforward built-in support for contextual menus, so you don’t need to worry about mouse-event handling – you just provide it a non-nil NSMenu and it does the rest.
class ContextualMenuViewImplementation<Content: View>: NSHostingView<Content>,
                                                       NSServicesMenuRequestor {
    @MainActor fileprivate var textProvider: @MainActor () -> String

    @MainActor required init(rootView: Content,
                             text: @autoclosure @MainActor () -> String) {
        self.textProvider = text
        super.init(rootView: rootView)
    }

    // Mandated by NSHostingView, but not actually necessary for our purposes here.  But feel free to give this a real implementation, if that makes sense for your use and needs.
    @MainActor @objc required dynamic init?(coder aDecoder: NSCoder) {
        fatalError("init(coder:) has not been implemented for ContextualMenuView")
    }

    // As above.
    @MainActor required init(rootView: Content) {
        fatalError("init(rootView:) has not been implemented for ContextualMenuView")
    }

    @objc override func validRequestor(forSendType sendType: NSPasteboard.PasteboardType?,
                                       returnType: NSPasteboard.PasteboardType?) -> Any? {
        guard sendType == .string || sendType == .init("NSStringPboardType") else {
            return super.validRequestor(forSendType: sendType, returnType: returnType)
        }

        return self
    }

    @objc nonisolated func writeSelection(to pboard: NSPasteboard,
                                          types: [NSPasteboard.PasteboardType]) -> Bool {
        guard types.contains(.string) || types.contains(.init("NSStringPboardType")) else {
            return false
        }

        let text = if Thread.isMainThread {
            self.textProvider()
        } else {
            DispatchQueue.main.sync {
                self.textProvider()
            }
        }

        pboard.setString(text, forType: .string)
        return true
    }

    @objc override func menu(for event: NSEvent) -> NSMenu? {
        NSApplication.shared.registerServicesMenuSendTypes([.string, .init("NSStringPboardType")],
                                                           returnTypes: [])

        let menu = NSMenu()
        menu.allowsContextMenuPlugIns = true

        // Insert other menu items here.

        return menu
    }
}
☝️ registerServicesMenuSendTypes(_:returnTypes:) is normally called in +initialize, but Swift doesn’t provide any way to do that (it explicitly bans declaring the method on your NSObject subclasses, for no apparent reason – perhaps a limitation of Swift’s Objective-C interoperability).
So, in the example above I’ve called it (every time!) in menu(for:). That works, but it is inefficient – you only need to call it once per app session. If your application has a natural, better place to put it, e.g. during app launch, move it there.
The only real complexity is in the NSServicesMenuRequestor delegate method writeSelection(to:types:). Because it’s declared nonisolated by the NSServicesMenuRequestor protocol, you’re forced to assume it can be called in any isolation context; from any thread. Unfortunately, at runtime it’s sometimes – but not always! – called from the main thread. Swift doesn’t have an elegant way to say “run this synchronously on the main thread / actor” – if you naively call DispatchQueue.main.sync(…) and you’re already on the main queue, it crashes your application! So you must manually check for being on the main thread, and handle that specially. 😒
The other thing you might want to consider, not shown in the simple example above, is whether you want to support Services sending data back to your view. e.g. they might transform the text and return the new text to you, or generate / source text from somewhere else entirely for you. If you wish to support that, you need to populate the returnTypes argument to registerServicesMenuSendTypes(_:returnTypes:) and implement the readSelection(from:) delegate method.
How’s it done better?
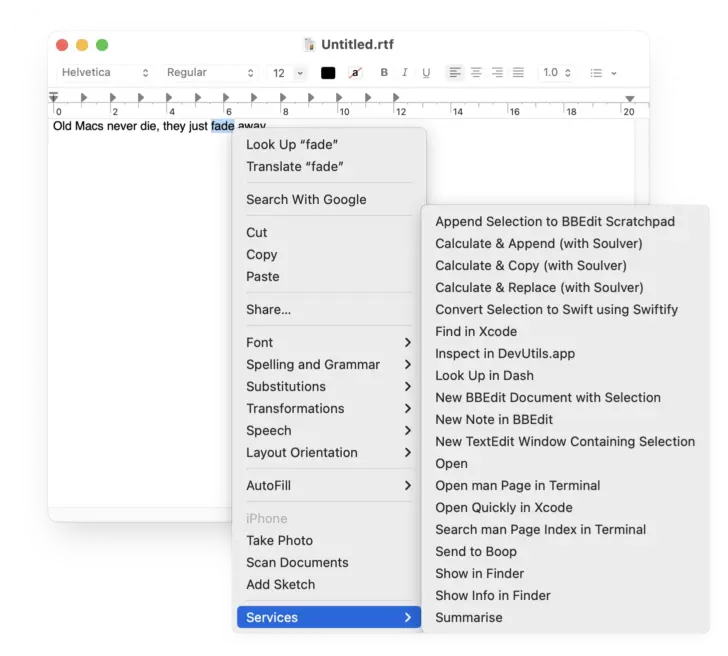
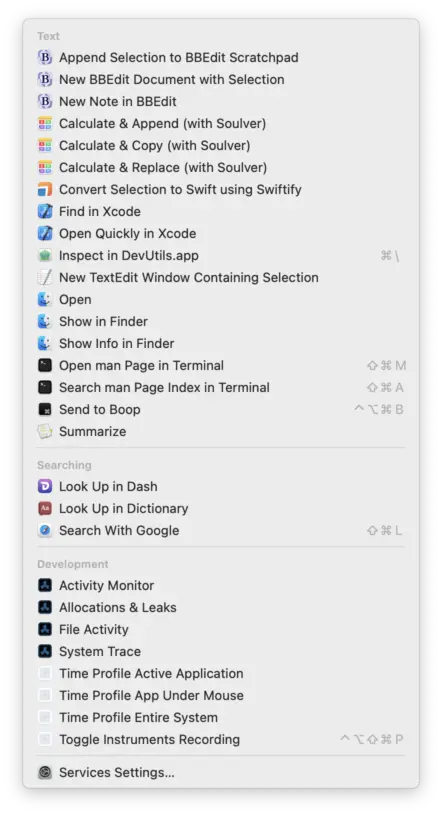
The above works – and is the canonical way to do it. It results in the same plain Services submenu as you’ll see throughout Mac apps.
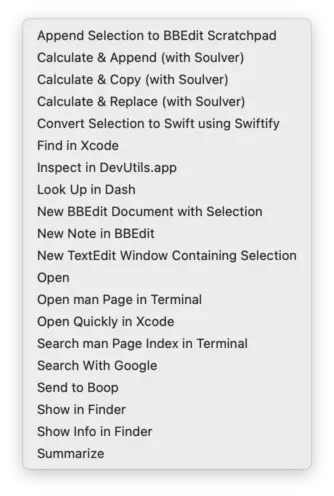
But that menu’s not great. It just dumps everything it a big amorphous list, with no delineation and merely alphabetical ordering.
Whereas if you look the Services submenu in the application menu:
…it is superior in many ways:
- There are more items.
- There’s a link to System Preferences / Settings to adjust which services are shown.
- There’s dividers in appropriate places, with subheadings, to help visually organise everything.
- App icons are shown to better visually distinguish each service.
- The grouping is somewhat alphabetical but with all services from a given app shown contiguously.
Some of the items shown aren’t actually context-specific – or at least, to no more detail than merely which application is targeted – but they’re intentionally relegated to the bottom, and could be handy anyway. e.g. if you can see any right-clickable area of any window of an application, you can quickly start profiling that application in Instruments.
It’s not hard, per se, to get the better menu. But it’s not documented, not officially supported, and has some broken edge cases. It is how many applications insert the Services menu into their menus (in fact it was the Electron source which helped me figure out how to do this in the first place), so it’s highly unlikely Apple will break it in the foreseeable future. Nonetheless, be warned.
The main edge case / bug that I’ve encountered is that this better Services submenu only works if the window is key. And there’s no way to force the window to be key (all of the AppKit APIs which seem specifically for that purpose flat-out do not work, such as makeKeyWindow). So you have to fall back to the lesser version of the Services menu in those cases. Which is basically whenever the view’s window is not the active window when the right-click occurs (or, whenever that macOS bug hits whereby the window is shown as if it’s the key window but actually isn’t 😤).
Anyway, with all that in mind and apparently not having dissuaded you, here’s the code to go in menu(for:):
menu.allowsContextMenuPlugIns = !(self.window?.isKeyWindow ?? false)

if !menu.allowsContextMenuPlugIns && !(self.window?.makeFirstResponder(self) ?? false) {
    print("Unable to make self the first responder - reverting to built-in Services submenu.")
    menu.allowsContextMenuPlugIns = true
}

// Add all your other items here.

if !menu.allowsContextMenuPlugIns {
    menu.addItem(NSMenuItem.separator())

    let services = NSMenuItem(title: "Services", action: nil, keyEquivalent: "")
    let serviceSubmenu = NSMenu()
    services.submenu = serviceSubmenu
    services.representedObject = textItem.provider
    NSApplication.shared.servicesMenu = serviceSubmenu
    menu.addItem(services)
}
Fortunately – and thanks to the deep elegance of AppKit’s design – that’s it! It otherwise uses all the same machinery as before (like writeSelection(to:returnType:)).
☝️ Making the view into the first responder is necessary to ensure it’s the one that gets called [first] about what data is available to the Services etc. And it’s also in principle the correct thing to do – any view that responds to your interactions should generally be [made] first responder as a result. And it seems to work perfectly in my use-cases.
But, be aware that it could cause issues in some applications, if it interacts poorly with whatever other view(s) lose first responder status as a result. I can only leave that as a warning and potential exercise for each reader, to figure out how to adapt the above to their circumstances as necessary.
(this isn’t a concern unique to this code, by any means, more the general warning for whenever you manually change the first responder)
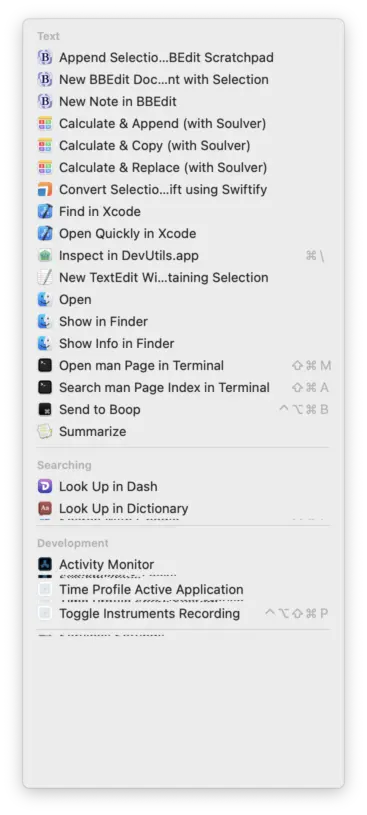
⚠️ macOS 14 Sonoma has a rendering bug when first opening the Services submenu within a given application session, as shown below. It’s not a big deal insofar as most of the items still work, and dismissing the menu and re-opening it fixes the rendering.
Bonuses
Since the contextual menu is empty except for the default Services menu, you’ll probably want to add in some of the other options that are typically found in the contextual menu – Copy being perhaps the most prominent and often-used.
Fortunately, it’s trivial:
@MainActor @objc func doCopy(_ menuItem: NSMenuItem) {
    let pb = NSPasteboard.general
    pb.prepareForNewContents(with: nil)
    pb.setString(self.textProvider(), forType: .string)
}

// Then, in your `menu(for:)` method:
do {
    let copyMenuItem = NSMenuItem(title: "Copy", action: #selector(Self.doCopy(_:)), keyEquivalent: "")
    copyMenuItem.target = self
    copyMenuItem.isEnabled = true
    menu.addItem(copyMenuItem)
}
One obvious missing piece is localisation of the “Copy” label; left as an exercise for the reader.
It’s similarly simple to add a standard Share menu item:
@MainActor @objc func showSharePopup(_ menuItem: NSMenuItem) {
    let picker = NSSharingServicePicker(items: [self.textProvider()])
    picker.show(relativeTo: self.bounds, of: self, preferredEdge: .maxY)
}

// Then, in your `menu(for:)` method:
do {
    let picker = NSSharingServicePicker(items: ["🐞"])
    let pickerMenuItem = picker.standardShareMenuItem
    pickerMenuItem.target = self
    pickerMenuItem.action = #selector(Self.showSharePopup(_:))
    pickerMenuItem.isEnabled = true
    menu.addItem(pickerMenuItem)
}
This one benefits from using the standard, AppKit-provided menu item, so you don’t need to handle localising its label.
The 🐞 is there for two reasons:
- You have to provide
NSSharingServicePickerthe nominal item(s) to share up front, in order to initialise it (and so it can tailor its display to the content).standardShareMenuItemshould actually be a class member variable, not an instance member variable – a design flaw in AppKit.
You don’t want to invoke thetextProviderclosure unless you really need to (it could be time-consuming to run, so you don’t want to run it unnecessarily nor while the user is trying to navigate the contextual menu lest it cause GUI hiccups). So an equivalent placeholder value – any other string, in this case – is better, and suffices. - I use the ladybug emoji so that it stands out if the value ever somehow gets shown to the user (it’s a bug, get it? 😄).
This one’s a little bit more iffy. If you think you genuinely have need of a Look Up item, consider whether you should be instead making the text selectable and simply utilising the built-in contextual menu support that selectable text views have in SwiftUI.
@MainActor @objc func lookUp(_ menuItem: NSMenuItem) {
    self.showDefinition(for: NSAttributedString(string: self.textProvider()),
                        at: NSPoint(x: CGFloat.infinity, y: CGFloat.infinity))
}

// Then, in your `menu(for:)` method:
do {
    let lookupItem = NSMenuItem(title: submenu == menu ? "Look Up “\(self.textProvider())”" : "Look Up",
                                action: #selector(Self.lookUp(_:)),
                                keyEquivalent: "")
    lookupItem.target = self
    lookupItem.isEnabled = true
    menu.addItem(lookupItem)
}
This doesn’t display perfectly. The use of infinities for the at argument causes it to draw a small yellow box at the top left of the view, layered underneath the contextual menu but usually still visible. That’s a hack for cases where you can’t determine where the text is, or the text being looked up doesn’t exactly match what’s shown in the view.
If you know the actual location of the selected text, you can specify that instead to get the yellow text drawn in that location. But beware: the text from textProvider must exactly match what’s rendered in the view, otherwise the yellow overlaid box – intended to look like a highlight effect – will look weird, because it [re]renders the text based on what textProvider returned. It also might not correctly match the font, in any case.
Thus why I caution against using the reinvention of this particular wheel.
- Possibly borrowed from earlier computers that had multi-mouse-button support, such as some Unixes, but I suspect just coincidence. I vaguely recall that they were the philosophical antithesis of Apple w.r.t. mouse buttons, with some *nix GUIs requiring at least three mouse buttons for their basic function. I seem to recall some of them labelling the buttons primary, secondary, and tertiary. ↩︎
- I doubt I came up with this metaphor – although it’s pretty obvious in any case – but it’s worth considering if it’s more than just a cute superficial analogy. AppKit forms the meaningful contents of the sandwich, providing its flavour, substance, and value, while SwiftUI serves only as the bread, there mainly just to convey the contents. 🤔 ↩︎

