Contents
Why should I do this?
WordPress relies on either ImageMagick or GD for its ability to read & write images. It prefers ImageMagick, as ImageMagick supports a much wider range of files, tends to be faster, and some assert that it produces higher quality files.
ImageMagick 6 was superseded by ImageMagick 7 nearly a decade ago. Version 6 is officially in legacy mode and while still technically supported (in a long term support sense) it generally receives only bug fixes – it fundamentally lacks many features, and most crucially it doesn’t support modern image formats correctly, such as AVIF1.
Additionally, ImageMagick is a common source of serious security exploits. It’s very important to run the latest version (or very close to) at all times, to have as many critical bug fixes as possible.
I recall when I was at Google there was – very begrudging – use of ImageMagick – it is the premier library for converting images when you really need to accept just about anything – but there were heroic efforts taken to isolate it and compartmentalise it, because it was taken as a given that it would be successfully exploited all the time2. Buffer overflows, memory corruption, etc – ImageMagick is written in plain old C & C++, and as such is inherently very prone to these kinds of problems.
Note that, depending on how you operate your WordPress site(s), you may or may not be seriously exposed to ImageMagick security problems. For simple single-author sites, where only the admin can upload anything to the site (images or otherwise), it’s arguably not a huge concern. But for more complex sites with multiple contributors – or worse, sites which accept images from general users or the public – using an outdated ImageMagick release is a serious risk.
Why isn’t this easy?
On some Linux distros, and when Plesk isn’t involved, it is easy – you just apt install imagemagick or yum install ImageMagick or at worst download the RPM and install that. Generally that installs ImageMagick 7 (and if not the very latest release, at least a recent one). You subsequently just run update on your package manager periodically and ImageMagick is kept reasonably up to date.
Ubuntu does not like ImageMagick 7, for some reason. No version of Ubuntu supports it officially, in the sense that it is not in any of the official package repos. If you apt install imagemagick, you’ll get version 6 – and not even a recent version 6, but 6.9.11-60 which is over three years old! That’s three years of well-known bugs – some of them potential security exploits.
So, unfortunately, the only way to install a modern version of ImageMagick on Ubuntu is manually.
Consequently, you have to manually install a suitable version of Imagick as well, and you have to do it into Plesk’s special PHP installation(s).
It took me several hours to figure all of this out, which is why I’ve written this post – so that nobody else ever has to.
The procedure
If you run into any issues, please let me know in the comments section at the bottom of the page. I endeavour to correct any mistakes, oversights, or confusion.
Note that most of these commands must be run as root. Either run them inside a root shell (e.g. su, or sudo bash) or prefix them with sudo.
Install ImageMagick 7
Fortunately, ImageMagick Easy Install (IMEI) exists to greatly simplify this step.
First, as a precaution IMEI insists you remove any existing ImageMagick installation(s). Manually installing a build of ImageMagick over the formally-packaged Ubuntu version could cause problems.
⚠️
Be mindful that as soon as you run this command, things on your server that rely on ImageMagick will no longer work! Fortunately this whole process takes less than half an hour, so it might go unnoticed (WordPress itself will continue working fine, serving up all existing media, but you probably won’t be able to upload new images until you finish this procedure).
If you do not finish the installation successfully, your server will likely be left in a bad, partly-broken state. In principle you can revert back to the standard system versions of things, with e.g. apt install imagemagick or perhaps through Plesk, but I haven’t tested it and I make no promises.
apt remove "*imagemagick*" --purge -y && apt autoremove --purge -y
Next, download and install ImageMagick:
pushd /tmp && git clone https://github.com/SoftCreatR/imei && cd imei && chmod +x imei.sh && ./imei.sh
By default it’ll install a very recent version – usually the very latest release – but you can customise it if you wish with the --imagemagick-version argument to imei.sh.
Note: I had to use the --force argument to get imei.sh to actually build & install all the components – for some reason it skipped the dependent libraries (for AVIF & JXL support) and just installed ImageMagick, without AVIF and JXL support. Try it without first, since that’s supposed to be the happy path, but check that it says [OK] for every item; that nothing is [SKIPPED].
Building libaom (for AVIF support) requires CMake 3.6 or later. Ubuntu 22.04 comes with a suitable version, so you shouldn’t have any issues. But if you’re installing on an older Ubuntu, a different distro, or you’ve messed with CMake otherwise, check that you have a suitable version with cmake --version.
Once it’s completed successfully – which can take tens of minutes if you have a wimpy server such as is often used for WordPress hosting – double-check that you have a good version installed:
identify --version
At time of writing that says 7.1.1-26 for me, but of course for you it’ll probably be something newer. You can consult ImageMagick’s download page to find out what the newest version is.
Install Imagick
First, download Imagick:
pushd /tmp && git clone https://github.com/Imagick/imagick && cd imagick
Next, you need to set the version string to the actual version – otherwise, at the very end of this process, you’ll find that WordPress quietly refuses to use ImageMagick / Imagick! Do that by editing the php_imagick.h file. You should see, somewhere near the top of the file, something like:
#define PHP_IMAGICK_VERSION    "@PACKAGE_VERSION@"
#define PHP_IMAGICK_EXTNUM     30700
You need to change that first string to the version declared on that second line. 30700 means version 3.7.0. So in my case I replaced "@PACKAGE_VERSION@" with "3.7.0".
Now you need to determine where the relevant PHP installation is – the version that Plesk is using to run WordPress for your website(s). You can find that out in various ways, perhaps the simplest being to log in to your Plesk dashboard, open the “Websites & Domains” section, and look at the PHP version listed for each website of interest.
☝️If you have multiple sites and they’re not all running the same version of PHP, you’ll need to repeat all the following steps for each PHP version.
In my case I’m using PHP 8.2. So now I know that the PHP install of interest is located at /opt/plesk/php/8.2/ (Plesk installs all its versions of PHP in /opt/plesk/php). I’ll use that in the subsequent commands shown here, but make sure to adjust that to suit whatever version of PHP you’re using.
To build Imagick, you need the PHP developer tools – for your particular Plesk PHP installation(s). e.g. in my case I’m using PHP 8.2, so I need to run:
apt install plesk-php82-dev
Now you need to configure the Imagick build:
/opt/plesk/php/8.2/bin/phpize && ./configure --prefix=/opt/plesk/php/8.2/ --exec-prefix=/opt/plesk/php/8.2/ --datadir=/opt/plesk/php/8.2/ --with-php-config=/opt/plesk/php/8.2/bin/php-config && make -j `nproc --all` install
Don’t forget to change “8.2” to your version of PHP, if it’s different!
It should only take ten seconds or so to configure, build, & install Imagick.
Now, rename the built library so that Plesk updates won’t clobber it:
mv /opt/plesk/php/8.2/lib/php/modules/imagick{,_custom}.so
Lastly, although it’s technically optional, it’s nice to fix the permissions of the installed library:
chmod 644 /opt/plesk/php/8.2/lib/php/modules/imagick_custom.so
Load Imagick into PHP
Annoyingly, PHP won’t automatically notice Imagick is installed – you have to tell it so, manually. Though this is pretty easy to do. There are a few ways to do it, the easiest being through Plesk: go to the “Tools & Settings” section of your Plesk dashboard, click “PHP Settings” (from the “General Settings” category), then click on the relevant handler in the list (e.g. “FPM application”). If you’re not sure which is relevant, look for a non-zero number in the “Domains” column.
☝️If you use different handlers for different websites – as will be shown in the “Domains” column by a number greater than zero for multiple rows – then you might need to repeat the following steps for each one of them. Start with any one of them, then when editing the php.ini file (as explained below) check which handlers are listed as also covered by that same file. If any are missing, those are the ones you’ll need to repeat these steps on.
Click on “php.ini” to switch to that tab, and you should see a text field containing the contents of the relevant php.ini file. Somewhere in this file – technically anywhere, but I like to scroll down to the section where all the other extensions are listed – you need to add the line:
extension=imagick_custom.so
Then, click the “OK” button to save your changes.
In theory Plesk will now restart the relevant server daemons, to have them pick up the change, but if you subsequently find that WordPress doesn’t seem to see the new ImageMagick installation (or you edited php.ini directly from the command line), you can give it a more forceful shove:
service plesk-php82-fpm restart
You should now be set – you can test your upgrade in a variety of ways, such as:
- Try uploading an image in a format, or using features such as animation or transparency, that wasn’t previously supported. e.g. AVIFs. Note that you might need additional WordPress plug-ins to enable use of the new formats, e.g. AVIF Support or any of the numerous SVG support plug-ins.
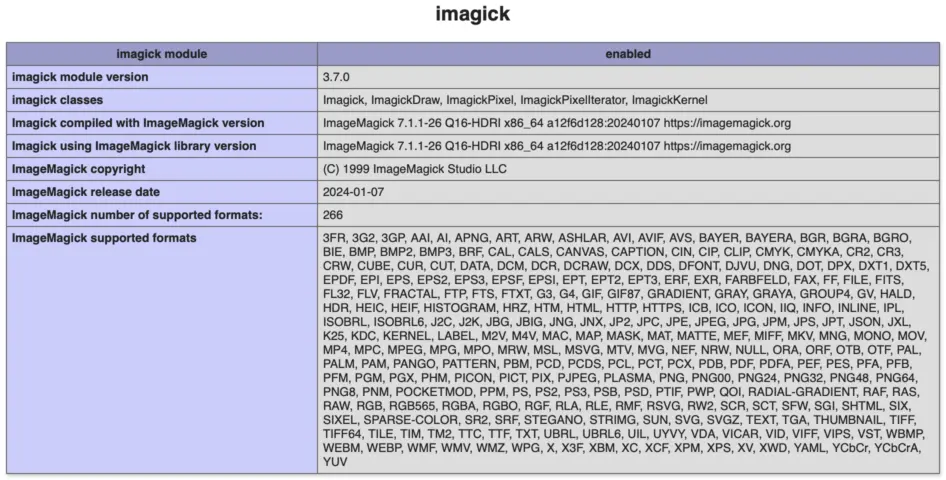
See also my earlier post on my Image workflow for WordPress – particularly the section on AVIF. - Check phpinfo – in your Plesk dashboard, go to your website(s) in the “Websites & Domains” section, click “PHP” (under the “Dev Tools” category), then click the subtle “View the phpinfo() page” link to the right of the first pop-up menus. Search for “imagick” – you should find an entry for it, with a table of plug-in information such as its version, the version of ImageMagick being used, and the file formats supported.
Addendum: updating ImageMagick & Magick
You can of course just repeat all the above steps to perform a fresh install, incorporating any updates since you last installed everything. But you can save a little time by keeping the imei and imagick folders around, and just doing:
git pull --rebasein each, then re-run their respective build commands. For Imagick you’ll probably have togit stashfirst, in order to do thegit pull, and then restore your version string patch withgit stash apply.
Don’t forget to check if you need to update the version string inphp_imagick.h.- Rename the built
imagick.soagain, and fix its permissions. - Restart the PHP daemon.
- Some versions & builds nominally support AVIF, but this support is almost by accident – what they actually support formally is HEIF, for which they use libheif, which can be built with AVIF support as well, but in my experience that support is buggy and incomplete – e.g. alpha channels are not supported. ↩︎
- Alas I don’t actually know if / how often it was successfully exploited, as far as Google saw. I have to imagine it was not uncommon, though, given the large attack surface that is ImageMagick’s APIs and image plug-ins, not to mention how lucrative a target Google is. ↩︎

Thank you so much for you proper guide and I appreciate it.
When I run this command,
/opt/plesk/php/8.2/bin/phpize && ./configure --prefix=/opt/plesk/php/8.2/ --exec-prefix=/opt/plesk/php/8.2/ --datadir=/opt/plesk/php/8.2/ --with-php-config=/opt/plesk/php/8.2/bin/php-config && make -j `nproc --all` installI get an error like this:
No such file or directoryAre you sure, this is the right command?
Most likely the error refers to
phpize, suggesting you’re not using PHP 8.2 as I am in the examples. The path tophpizedepends on your installed version of PHP – check in/opt/plesk/phpto see what version(s) you have installed.I have PHP 8.1 and 8.2 installed.
But, there is no ( phpize ) and ( php-config ) file or directory inside bin directory ( /opt/plesk/php/8.2/bin ). How and where did you add them before?
Also, should I copy and paste all the below commands at once or are they pasted/run separately?
/opt/plesk/php/8.2/bin/phpize && ./configure –prefix=/opt/plesk/php/8.2/ –exec-prefix=/opt/plesk/php/8.2/ –datadir=/opt/plesk/php/8.2/ –with-php-config=/opt/plesk/php/8.2/bin/php-config && make -j `nproc –all` install
Ah, okay, that’s interesting… perhaps they’re not installed by default with Plesk.
Can you try running
apt install php8.1-dev php8.2-dev? I think that might be the missing step.Can you record and upload a video on YouTube of installing ImageMagick 7.x.x and Imagick and how you compiled it for other non-technical people like me. 🙏
Super article! Thank yo uvery much
Just a notice
Better do not use /opt/plesk/php/8.2/lib/php/modules/imagick.so
but rename imagick.so eg to imagicknew.so at modules directory
and change accordingly /opt/plesk/php/8.2/etc/php.d/imagick.ini to point at
new module, else your imagick.so file will be overwitten at a plesk update
Thanks again
Thanks for reminding me about this – I had meant to follow up on this to see if I could work around that Plesk updates issue. I’m currently experimenting with a method that’s basically what you suggest – I just need to wait for the next Plesk auto-update and see if it works.
Only threat is if plesk will rewite imagick.ini with the old module, in this case i will rpm -e –justdb plesk-php82-imagick in order to ignore at installation
The downside, if I understand
rpm -e -justdb, is that it’ll prevent Plesk from keeping it up to date (because Plesk will think it’s not installed). That’s not ideal either (there could be important security fixes in updates).I tried your instructions and while they work perfectly with plesk-php82, they fail with plesk-php83. Everything compiles normally, but plesk-php83-fpm service refuses to load the imagick_custom.so module with:
– These options need to match
– in Unknown on line 0
did you ever find a solution? i have the same problem on php 8.4
Yes. I use php8.2
Have you tried this recently? I tried it on PHP 8.4 and 8.5, and it failed. It installs, but PHP fails to pick it up.
If I change
#define PHP_IMAGICK_VERSION “@PACKAGE_VERSION@”
#define PHP_IMAGICK_EXTNUM 30700
to
define PHP_IMAGICK_VERSION “@PACKAGE_VERSION@”
define PHP_IMAGICK_EXTNUM 30700
Thought I would try the above, and it fails to build.
I haven’t tried PHP 8.4 or 8.5, but it still works [for me] with 8.2 & 8.3.